
Friday, 19 January 2024
Nearly Organlike
It is starting to get there. Now to decide where things will go, where to cut curves on the top. How much to adjust the bench down, etc

Console Frame
Today I spent some time making the console frame. It is ordinary construction 2x4 and 2x3. it doesnt matter what it looks like as it will be clad and bits added to make it look neat and tidy. Using coach screws to attach it together.


For the first time I have an idea of the size and room I have to play with. Later I will test fit the subwoofer and PC to see where their locations will be once the pedalboard is in its rough location.


For the first time I have an idea of the size and room I have to play with. Later I will test fit the subwoofer and PC to see where their locations will be once the pedalboard is in its rough location.
Thursday, 18 January 2024
Coming Together
I love it when a plan comes together... At least parts that were built away from the pedalboard actually fit and I don't have to do any swearing and modificatoons!

Hopefully the bench will get some paint tomorrow and while that is drying the stand to hold the organ top for the console will be built. Then I'll be in a better position to see where everything is going to fit inside it and make decisions.

Hopefully the bench will get some paint tomorrow and while that is drying the stand to hold the organ top for the console will be built. Then I'll be in a better position to see where everything is going to fit inside it and make decisions.
Key stack and FCB1010 platform
Today I did a bit of work on the keyboard stack. The front pieces are done. They received a channel for the plywood base to sit in. This was done with a bit at the router table then a hammer and chisel to square the corners up. I then gave a coat of Danish Oil to finish them. The lower blocks of wood recieved a channel in as well. My aim is to build the keyboard stacks tomorrow.


The piece of veneered MDF which will be the top was also given some Danish Oil. When the keyboard stack is done I can do some cutting of the top as I want some curves along the front edge and corners.

Finally a platform was made for the FCB 1010 to sit on at a roughly 40 degree angle. It is a simple piece of plywood with some offcuts to hold the unit in place and at the height needed to clear the pedalboard frame so it sits over it.


Wednesday, 17 January 2024
Updates
I disassembled the rest of the organ in the room today. It feels quite empty in there. Hopefully for not much longer though.

The bench received some glue and will be sanded and painted. The bench top has started to receive some Danish Oil and is looking lovely and smooth. I love Walnut.


The bench received some glue and will be sanded and painted. The bench top has started to receive some Danish Oil and is looking lovely and smooth. I love Walnut.

Behringer FCB1010 Modification
As part of the organ re-build I am going to keep the Behringer FCB1010 foot controller to use the two swell pedals. I decided to modify it though so the plastic was covered by a nice wood.
I opened the back of the unit and the two pedals are attached via four screws. The way the pedal works is it has a piece of plastic that transitions from black to clear. There is a light and a sensor detects how much light there is an turns that into the volume being full or off. Clever but simple.


You can tighten the screws up as well if you want a stiffer pedal once the bracket is free from the unit. It is simply a nyloc nut that a little spanner can hold and you can tigthen a screw.
I made the new Swell pedals out of some tulipwood that was just wider than the pedal itself. I screwed these on with some self-tapping screws from behind. I then sanded and rounded over the pedals and finished with some Danish Oil to give a lovely smooth feel to it.


Tuesday, 16 January 2024
Wiring Sustain Pedals
This evening I pulled out one of my Behringer UMX 61 keyboards and attached it to a computer with the program MIDIOX on so I could see the commands being sent. I needed to find a way to hook up sustain pedals easily, hopefully by connecting to the onboard buttons. After playing around with the keyboard and having some idea how the switches worked I purchased some 1/4" female mono jack sockets and hooked up my sustain pedal. I quickly found out that the top rail of the UMX 61 switch PCB works with the tip of the jack and that the bottom part worked with the main part of the jack.


From this I will now be able to wire in the amount of jack sockets I need and purchase some sustain pedals to work for my Cavaille-Coll foot pedals. I will need to solder a test one and fire up Hauptwerk tomorrow to make sure it truly works.


From this I will now be able to wire in the amount of jack sockets I need and purchase some sustain pedals to work for my Cavaille-Coll foot pedals. I will need to solder a test one and fire up Hauptwerk tomorrow to make sure it truly works.
Jigsaw Tips
A lot of curves are cut with a jigsaw for this project. I used to have a cheap bandsaw but it never ran right, was frequently breaking blades and a nightmare to setup. A good bandsaw would be better than a jigsaw for getting smooth flowing curves. But a cheap jigsaw is less stress than a cheap and poor bandsaw.
I recommend getting a variable speed jigsaw, with pendulum and a locking trigger. This last feature makes it easier to hold your jigsaw steady and guide it. Use both hands, let the jigsaw do the work apply even pressure with both hands when moving it.
Also make sure your piece is firmly clamped down. I recommend one handed quick clamps as they allow pieces to be moved and adjusted quickly. Also dont have too much of the piece you are cutting unsupported.
Bench Almost Complete
Today I cracked on and made two more stretcher bars for the lower part of the bench. It is too cold to glue so I switched to hiding screws and going to plug them. It is going to be painted anyway so they won't be seen.


Just some refining to do and adding some pieces along the top to attach the top to. Then preping it for sanding and paint.
Hopefully now this will be out the way tomorrow morning the keyboard stack will come along quick and the main table part of the organ console. After that it will be boxing it all in and hiding bits. I don't think I will finish by Saturday as I originally intended but I have a few days off at the end of next week so hopefully by the end of January this will be completed. We will see. I hope it doesn't take as long as Gaudi's La Sagrada Familia has taken...
Bench Progress
Things are going slower than I hoped. I have cut and shaped two stretcher pieces for the bench but need to do one more for the bottom.
I used various tools jigsaw to make a curve, spindle sander and rasp file along with hand sanding.The router table was then used to add a 1/2" roundover to the sides.


I also cut the pieces to make the keyboard stack which I will work on while the glue is drying on the bench later. The sides are made from walnut and the base is 12mm plywood. The plywood will sit in a slot in the cheeks and have a solid walnut front.


The problem is it is so cold the glue isnt really working properly adding to the delays. I hope once the bench is out the way the main part of the organ console will come together quite quickly.
Monday, 15 January 2024
Clamps
You can never have too many clamps of varying types. As seen here with the spreader for the bench they come in handy!


Sunday, 14 January 2024
'Happy Little Accidents'
As the painter Bob Ross used to say "There are no mistakes just happy little accidents." Today was full of 'happy little accidents' as the legs took shape and evolved, the plan and design changing several times due to 'accidents'. I feel Gaudi would approve - his pieces evolved constantly from plan to final build.
I started off by drawing and re-drawing curves on to a sheet of thin plywood. When I was happy with the shape I wanted I cut it out with my jigsaw. This was then sanded and refined to give a smooth edge. I then cut two leg blanks out of a piece of thick Meranti I had and transferred the design to one of them. I flipped the template on the leg to give both sides. The Meranti is 30mm thick, 30 cm wide and each leg piece is 67cm tall. The jigsaw was used to cut the curves as close as possible to the line. I then spent time with the oscillating spindle sander and hand sanding at 60, 80 and 120 grits to refine the curves and smooth it all out.
Meranti is like the MDF of the hardwood world. It is easy to work, sands smooth and paints lovely. However it likes to chip quite easily especially with a router near the edges of pieces. It is one of the softer 'hardwoods' but it is cheap for large amounts.

When I had a shape I was happy with I stuck the cut leg to the blank using masking tape on each and super glue in between. This gives a solid connection and allows you to use a flush trim/template/pattern router bit to cut the second one without them coming apart. However, while routing I didn't realise at one point the bearing had fallen off the router bit so it was cutting into the blank. This left me having to refine the second leg into a new shape, so both parts are slightly different. (Before routing it is best to cut close to the shape you want with the jigsaw so that there is less work for the router to do)
Once I sanded the curves and refined the shapes I added a 1/2" roundover to both sides of each leg. I then spent some time sanding the surfaces and edges by random orbital sander and hand at various grits to get them smooth for painting.


I will need to make the stretcher pieces tomorrow and assemble it. Then paint it white and attach the bench top, which will also receive some paint. It is probably hard to picture how these strange shapes will come together to form a bench but the idea is in my head... I think!
So why the strange shapes? Well I saw a window at Casa Battlo that was a series of strange curved shapes. I took isnpiration from this and did the best within the limitations of it having to be a strong, functional bench. Gaudi liked nature as his inspiration and I think with the roundovers it could almost be tree-like.
I would recommend a bandsaw for this type of work but mine broke a few years ago. A jigsaw can work but you have to be careful not to let the blade deflect while moving it through the wood as it will lead to an edge that isn't straight. Also an oscillating spindle sander is the fastest way to smooth and refine curves and remove blade marks from the edge. You can sand by hand or use a rasp but it is so much easier to pick one up for doing curved work. A router and track saw and very handy tools to have. You don't need the best or most expensive. My tracksaw and jigsaw are a hardware store's own brand and do the job cheaply.
Saturday, 13 January 2024
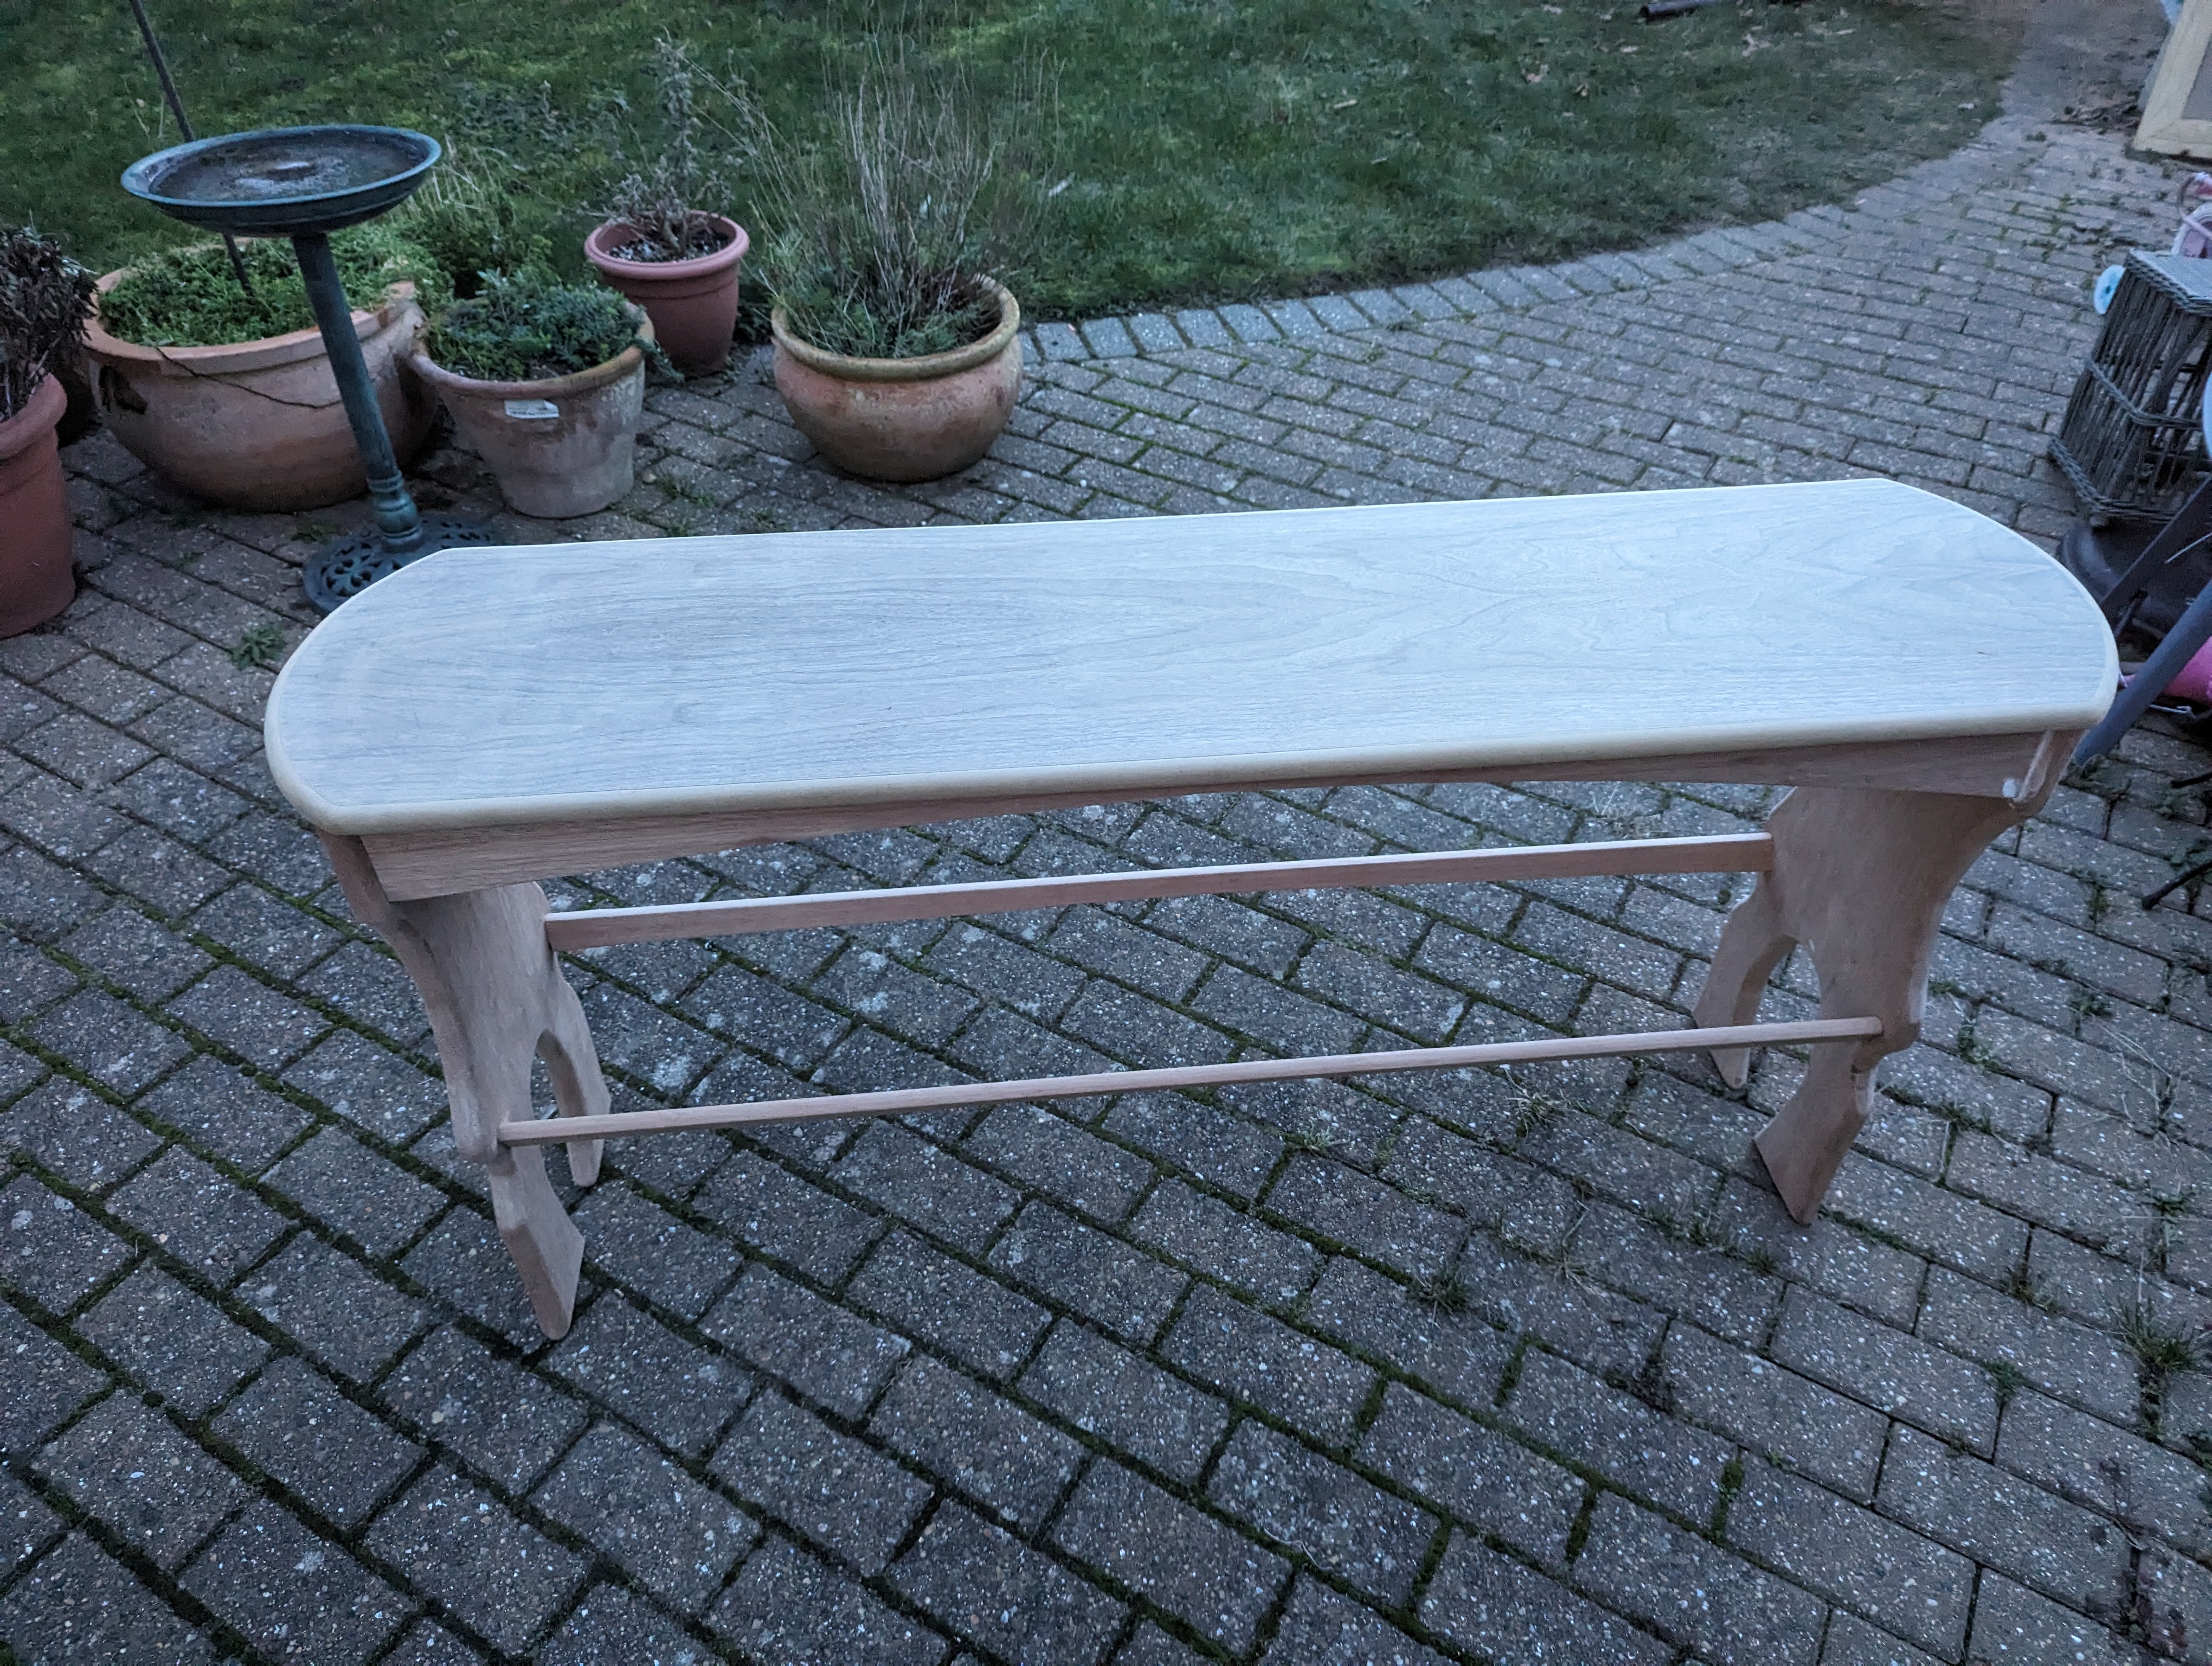
Organ Bench
I had to wait until mid afternoon for a couple of bits to turn up. Once they had I planned my organ bench build. The top is 140cm by 35cm. I rounded the corners off with a jigsaw to create a nicer shape.


I then used an oscillating spindle sander to smooth the curve to my pencil line. these tools are invaluable if you are doing curves ot enlarging holes. After this I hand sanded with 80, 120, and 240 grits to make sure everything was smooth.

The bench top then received a 1/2" roundover on both sides and more hand sanding to make it smooth.

The MDF part showing at the moment is going to receive some white paint but I may introduce a slight curve along the front edge yet.

>


I then used an oscillating spindle sander to smooth the curve to my pencil line. these tools are invaluable if you are doing curves ot enlarging holes. After this I hand sanded with 80, 120, and 240 grits to make sure everything was smooth.

The bench top then received a 1/2" roundover on both sides and more hand sanding to make it smooth.

The MDF part showing at the moment is going to receive some white paint but I may introduce a slight curve along the front edge yet.

I am taking my inspiration from Gaudi's serpentine bench at Park Guell in Barcelona but it also needs to be practical to sit at and use the pedalboard. The legs are going to be made tomorrow and I need to decide where to place the speaker bar. I will probably introduce some fancy curves on the legs.
Friday, 12 January 2024
Tools Setup
I managed to make good use of today tidying my garage and setting up the tools
I'll need. In the sale over Christmas I managed to pick up a 10" 255mm table saw
from a company called Rutlands. My previous one died a couple of years ago so
now is a good time to get a new one.
 I also picked up a router table to use my Triton JF001 router with. In the past
I jave just used an mdf sheet with 2x4 legs as a router bench but this is more
sturdy and allows me to do more.
I also picked up a router table to use my Triton JF001 router with. In the past
I jave just used an mdf sheet with 2x4 legs as a router bench but this is more
sturdy and allows me to do more.
 An old pillar drill and planer thicknesser will come in
handy. I also recommend a track saw for cutting large panels easily. They are
like a circular saw but run along a track. My router can even attach to the
track for long straight cuts.
An old pillar drill and planer thicknesser will come in
handy. I also recommend a track saw for cutting large panels easily. They are
like a circular saw but run along a track. My router can even attach to the
track for long straight cuts.


The Chaos Begins
This morning I went to my local wood yard and got all... some... most - hopefully! of the wood that I need for this project.
I feel like Im on that TV show Scrapheap Challenge where you are given a task and have to rummage through a scrapyard to make it a reality.
It is my job this week to turn this pre-cut wood, offcuts and boxes of cable and hardware into an organ to fit this space.
Lots to do today. Plan the build. Tidy my workspace. Take measurements from the old console and disassemble. Setup my tools. Hopefully it wont snow...


Wednesday, 10 January 2024
Pistons or not?
One thing I love about old organs is the lack of pistons. It makes the console look a lot cleaner. Some of these modern organs seem to be like an aircraft cockpit with the amount of buttons! However, they are useful to have.
Someone had mentioned using these USB Macro keys as pistons. I got a set to try and they work as standard as 1 - 7 keys on a keyboard. There is a way to program them to do other things but my idea is to remove the keys and use the mechanism with a dowell rod inserted to make pistons. I'm not sure I'll place them under the keyboards but maybe have a couple of sets above in the centre by the music desk. Or even have a hidden panel that removes to reveal them when I use an organ where pistons would be useful. I'm not sure but I want to integrate them somehow while avoiding 'clutter'. Same with other buttons for turning the PC on, volume knobs, headphone socket. All of these I'd love to hide. Maybe a little drawer or behind a panel. Once I have the basic structure of the organ done and can step back and view the big picture then these little things will take shape.
Someone had mentioned using these USB Macro keys as pistons. I got a set to try and they work as standard as 1 - 7 keys on a keyboard. There is a way to program them to do other things but my idea is to remove the keys and use the mechanism with a dowell rod inserted to make pistons. I'm not sure I'll place them under the keyboards but maybe have a couple of sets above in the centre by the music desk. Or even have a hidden panel that removes to reveal them when I use an organ where pistons would be useful. I'm not sure but I want to integrate them somehow while avoiding 'clutter'. Same with other buttons for turning the PC on, volume knobs, headphone socket. All of these I'd love to hide. Maybe a little drawer or behind a panel. Once I have the basic structure of the organ done and can step back and view the big picture then these little things will take shape.
Tuesday, 9 January 2024
Making Dreams Reality
Does anyone else struggle to turn their ideas into reality?
I always have grandiose ideas, designs in my head for things, or pieces of music floating about I hum or hear in my head. But I always struggle to turn the ethereal into the tangible. When I sketch ideas they end up rubbish.
I have an idea in my head for this organ but It is hard to share or give you an idea of what it is beforehand. For that I apologise. Hopefully it will all unfold over the coming days.
The build overview
On Friday I will be on the first of nine days off. I plan to get the remaining wood from the timber merchant, setup some of the tools I need in my garage space and start planning the build.
The first part to built will be the keyboard stack. From here I can then measure for the table it will sit on. Then I will build the organ bench to get the largest pieces out of the way. The table structure will then be used to make the rest. I plan to have a cabinet like curved structure for the touchscreens and music desk leading to an upper part which will house the speakers. Below the table will be hidden away with more curves and adornments.
How long this will all take is unknown. It depends on weather. How long I take to figure stuff out and my motivation. I also need to order a few more things and work on some electronic stuff to make the foot pistons work. This will require experimentation adding to the time. If I can get it done in nine days I will be happy but I don't want to rush like the last build and end up with a bodge job.
Expect plenty of pictures in the coming days!
Why Cavaille-Coll? Why Gaudi?
In 2005 my parents were moving from England to France. I decided to learn to play the organ. My dad was an organist at our local church and I thought I'd give it a go. I had learned a bit of keyboard as a child and also had played guitar for a few years. I was influenced early by the organ CDs my dad had - english organs and Bach. But I don't know if it was the cheap CD recordings I purchased but English organs didn't sound right to me. Fast forward a couple of years my parents sent me an organ CD from a French cathedral. I was hooked. The roar of the reeds. The mixtures. The power. It was this that I had been seeking. In 2007 we did a tour of organs and I visited Caen and also St Ouen in Rouen, among others. Purchasing CDs from each I fell in love with French organs and music.
Fast forward to 2023. I was going on holiday to Barcelona for a week. Of course I wanted to visit La Sagrada Familia, the huge church that is still under construction over a hundred years on. I had enjoyed looking at quirky buildings on my travels and noted many, as well as the lovely Park Guell over looking Barcelona. I loved them all. I learned about their designer Antoni Gaudi. Coupled with a visit to Sant Pau, an old hospital in similar style I knew I had found a style that appealed to me.
This year when trying to find inspiration for my organ rebuild I was going to keep it simple to fit it in to a weeks holiday. But as I thought more about it I wanted something that would bring the space alive in the room and give me a challenge. What did the amount of time it took to build really matter, I wanted something I could enjoy for many years to come and would be unique but a fitting tribute to Cavaille-Coll and Gaudi.
Monday, 8 January 2024
Life is a facade
Through my love of visiting old stately homes I have come to learn even the rich fake it.
Exotic wood veneers over cheap wood. Wood or cheaper stone made to look like marble. a single course of expensive stone covering cheap brick building fronts.
I have chosen Walnut veneered MDF for this project. I could use solid walnut - there will be some for key jambs etc. - but the added cost of having a solid walnut board will do little to add to the project.
MDF is easy to cut, sand, paint and shape. It is strong and although long lengths sag it will be supported by a wood frame. By the end the only one who will know that it is MDF inside is me.
This project is also thd perfect opportunity to use up old bits of scrap plywood, pine and various hardwood offcuts in the interior. There may even be bits of the previosu two generations of organ put to good use.
Saturday, 6 January 2024
The Hardware
The organ runs on a computer that is about 10 years old technology wise and Windows 8.1. It just about does what I want it to. While I would love to upgrade the computer I don't want the hassle of the newer Hauptwerk and upgrading samplesets.
PC
The PC runs an AMD FX 3200 8 core processor. It runs many samplesets fine but if you play too many stops on a fast piece of music it can struggle. This is because the cache levels aren't great. However, for Caen with all the front loaded or all the rear, or all the front and selected rear ranks it does adequately for my needs.
There is a total of 32GB of DDR 3 1866mhz RAM sticks in the computer allowing a sizeable older organ sampleset to run.
I have recently upgraded the graphics card to a GT740. I don't need amazing performance just the ability to run 3 monitors. The good thing about running an old PC is the abundance of cheap parts floating around!
The touchscreens are a 22" Hanspree one I bought 8 years ago and two smaller 12" portable touchscreens off Amazon. The brand doesn't matter they'll all generic Chinese made things rebranded with whichever shop is selling them. They run the stop jambs nicely in portrait mode.
Soundcard
I purchased a ESI Gigaport EX recently. It allows 8 channels to be used. Probably not the greatest but it was a decent price, a small little box and will accomodate what I want to do. There are also two headphone ports, one for channels 1-2 and one for all 8. They don't silence the speakers when plugged in. This has advantages in you can run extra speakers. But it will mean when I want to use headphones i'll have to turn all the speakers off.
The Speakers
For a long time I only used headphones of various sorts. Then I upgraded to Alesis 5 elevate MKII speakers. These are okay at handling the sound but sound a bit warbly and thin on higher notes, especially something like a Trumpet. There is a large 10" subwoofer I purchased but have never really used which will be hooked up with these speakers to run the lower pipes. I have purchased 4 Behringer Studio 50 speakers. 2 for the Great and 2 for the Swell. The Positive will be a soundbar I have placed below the organ bench. It does a decent enough job and the positive I only really use the softer 8' and the 16' Bassoon. Eventually I plan to get another set of speakers either to run reeds through or to act as rear rank speakers elsewhere in the room.
The Organ
There are three keyboards. Two Behringer UMX 61 and one random 61 note midi keyboard which isn't a great feel but works. The pedalboard is a 30 note straight BDO from Muz Or I purchased 8 years ago. Behringer FCB1010 has provided foot pistons the past few years and swell capabilities. It will continue to be used for Swell pedals but I aim to turn sustain pedals into footswitches.
Gaudiesque Cavaille-Coll inspired Build
I have been a member of Contrebombarde "gooseh" for many years. There you can see my original organ build. Gooseh I won't post pictures of the 'upgrade' I did which was actually a downgrade!
Several years ago I set out to turn my two Behringer UMX61 keyboards perched on my chest of drawers into a Hauptwerk organ. It started off as a simple table like design with two manuals, which quickly became three. I added a pedalboard and a Behringer FCB1010 foot controller to the setup. I was happyish with this but thought I could do better. A year or so later I moved house and set out to rebuild it. However, I rushed, lost patience and things got in the way so the sub-par replacement has never been finished nor very good.
I finally aim to end this by building an organ that suits my requirements. Using the hardware I already have for the PC and adding new speakers I hope to finally get a playable organ.
Inspired by Content Cambiare 315 I was going to build a simple cabinet style organ. But while I like the sleek look and it would be easy to build, I like the unique and to embellish. I have woodworking tools and a few years experiencein making things. But I wanted to challenge myself and make something that would fit my requirements but look good in the room and not an eyesore box that could be mistaken for a wardrobe.
I've always been inspired by contrasting dark and light wood together in a project. My dream a while back was to own or make a Rickenbacker guitar in walnut and maple. Or any kind of guitar like that. My house also has white staircase with dark wood hand rails. Through my love of visiting old stately homes in England I like the combination of white and gold as well as dark wood. But I didn't want something to be completely white or with a few gold bits on - that would remind me too much of cheap furniture of the past with very cheap looking white and gold plastic features.
I have in my mind what I want the organ to generally look like. Whether I can make it a reality depends on my patience and not losing focus. I have liked French organs for a long time and especially the Caen organ which I visited many many years ago. The organ will be three manuals. It will have speakers for the Great/Pedal, Swell and Positive and maybe one day a set for the far samples. It will have three touchscreens - an existing 22" which will sit behind a music desk to do menial computer tasks and also to use as a screen for sheet music on the computer. It will also have two smaller 12" touchscreens either side to act as the stop controls. I did think of finding a way to add pistons, or to use some Korg Nanokey 2 as button stops. But I wanted a sort of sleek design and touchscreens suited several sample sets easier.
The main use of the Organ will be for the Caen sampleset ( I may add Warrington Cavaille-Coll too). I aim to try and turn some piano sustatin pedals into Cavaille-Coll type foot switches. However, I have no use for Tremolo or Orage that Caen has so will probably change one to control the 32' stops and maybe the other to turn reeds on and off. I haven't completely decided on that yet. The FCB1010 will control volume and act as Swell.
So where does the Spaniard Antoni Gaudi come in? Well I like some of his things. The curves. The elaborate. The use of nature. I hope to take inspiration from some of his buildings to make a truly unique organ that is both functional and nice to look at. It may end up being a complete failure or mess. But hopefully what I have in my mind comes to life and even if no one else likes it atleast maybe I might!!!
Subscribe to:
Comments (Atom)
Nearly Organlike
It is starting to get there. Now to decide where things will go, where to cut curves on the top. How much to adjust the bench down, etc
-
In 2005 my parents were moving from England to France. I decided to learn to play the organ. My dad was an organist at our local church and ...
-
 Today I did a bit of work on the keyboard stack. The front pieces are done. They received a channel for the plywood base to sit in. This was...
 -
 I disassembled the rest of the organ in the room today. It feels quite empty in there. Hopefully for not much longer though. The bench r...